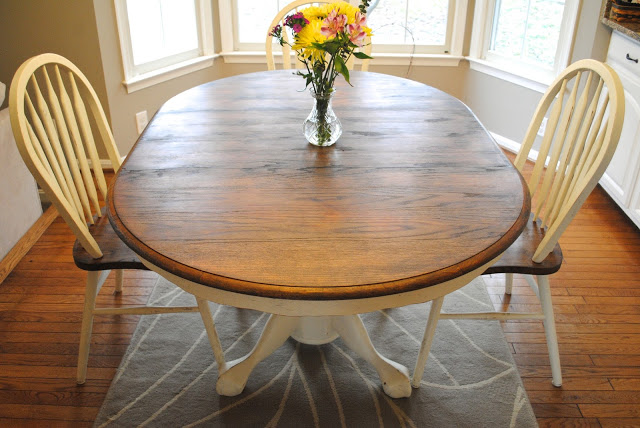
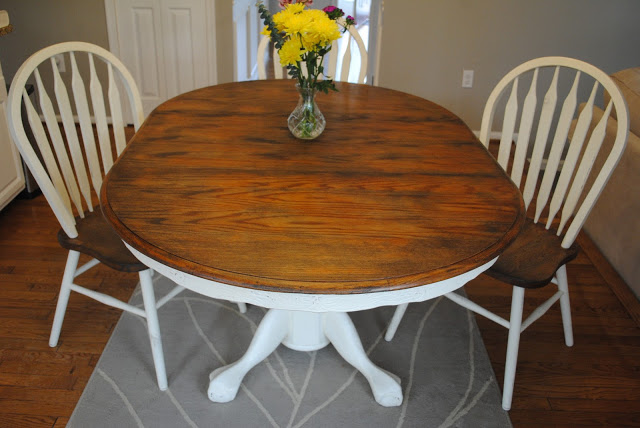
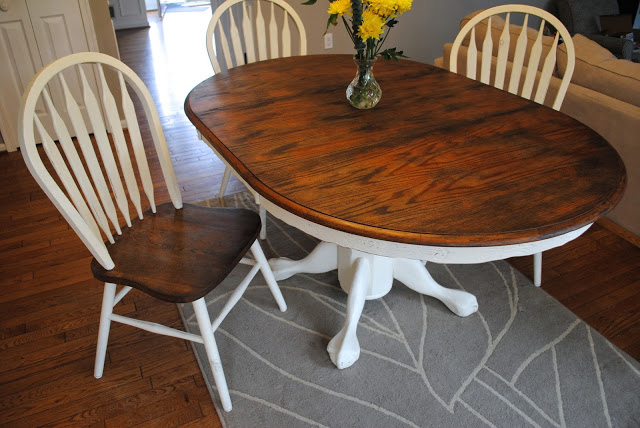
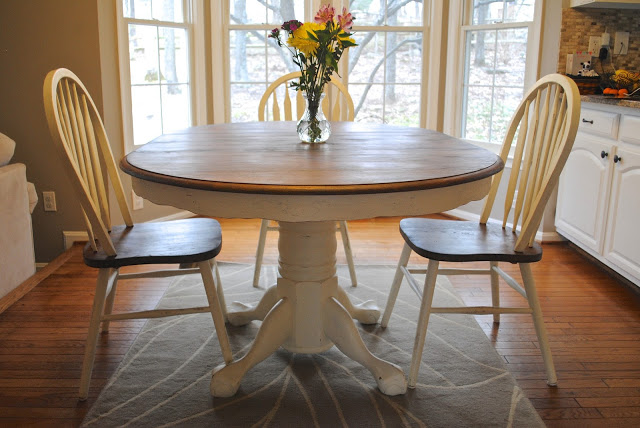
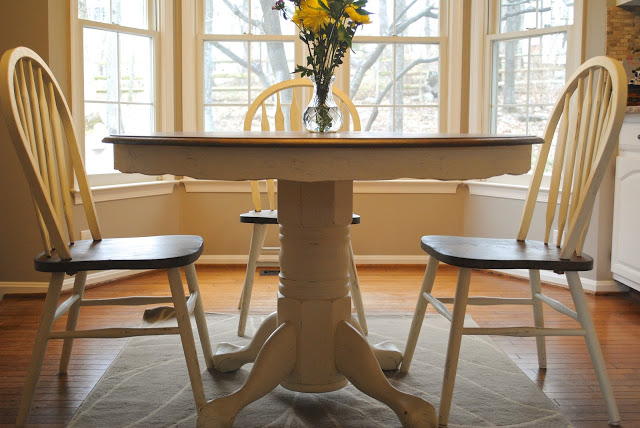
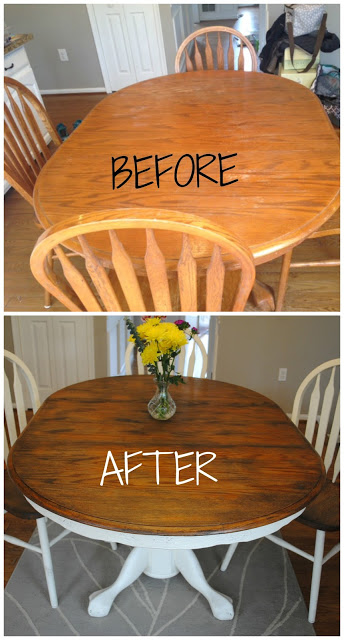
So I can’t take any credit for this masterpiece unless moral support counts 🙂 Remember the amazing whitewash brick post at my friend’s new house, well she has done a TON of projects to amp-up her decor in a budget friendly way by utilizing items she already had and giving them a complete makeover. This gorgeous wood table was her grandparents and spent years waiting for her to have space to display it. I am pretty obsessed with the claw foot detail and how she decided to keep the stunning wood on the top and on the seats.
How she accomplished this…
She started with sanding all the areas she was leaving wood just enough to get the top protective layer off. After a damp rag wipe off she was ready to stain. On the wood parts she used a dark walnut wood stain
and finished with a matte finish polyurethane
. The white paint is Annie Sloan ‘Old White’ color. After it dried, she lightly sanded the painted surfaces giving it a distressed antique look.
We had so much fun Friday night around this table and I can’t wait for more girls night in the future laughing around this beautiful inherited treasure.




LOve the decor, i always love shabby chic decor, they make me smile
http://www.Glowlicious.Me | Lily Widjaja
Thank you Lily!
how did you do the spindles, specifically where the back portion of the chair meets the seat bottom? Seems like it would be much easier if you were able to remove it form the seat bottoms. Thanks
how did you do the spindles, specifically where the back portion of the chair meets the seat bottom? Seems like it would be much easier if you were able to remove it form the seat bottoms. Thanks
Hi Evan – Thank you for commenting! She stained the seat first by taping off the spindles and legs so the stain did not bleed. Once dried she removed the tape and tape the newly stained wood to protect it from the white chalk paint she used. You can also use a very small brush to touch up the areas where the wood and paint meet for a polished end result. Hope this helps!
Did you put any sort of protective coat over the chalk paint? We tried using a wax and the white started to yellow the white.
Hi Sarah, on her project she did use the AS clear protective wax as protective coat. I used Old White on my dining room table and also used the clear wax without yellowing. It may be some of the wood sealant/stain coming through. You might want to try sanding your piece a little. Good luck!
I really appreciate the links to the products you used! I am considering using the stain on the entire table (I have the exact same table as shown here!) How many quarts do you think that would take? Or just to gauge, how many quarts did it take you just to do the table top and chair seats?
Thank you!
Hi Kate!! You are very welcome!! I would loved to see the finished product. Good luck staining! 1 quart for this table was enough.
Best explanation I've read
Thanks Elizabeth!
Her table came out great and I love the chairs, I wish I had the chairs to match. I would recommend using stripper on the table top to remove any protective coatings prior to sanding. I had greater success when I did this. xoxo Ari xoxo
Thanks Ari! That is great advice!
I have the exact table and chair set – and the dark color was really getting to me. What a fine idea you gave me with the repainting! Unless I missed the post, did you have to apply a clear "wax" or coating to both the stained area AND the white painted area? Was it chalk paint u used? I have heard chalk paint has a funny feel to it. Love your ideas!!
Forgot to ask.. did you sand any of the areas before painting/staining??
Hi Carolynn – She sanded the stained areas first but not the white Annie Sloan chalk paint (old white color) parts. She used a poly to protect the stain and the AS clear wax to protect the paint.
Love how your dining set turned out. I too have the same set and would like pointers on painting and staining the chairs. Since I'm a novice, all advice is needed and welcomed.
Thank you so much!! I'm working on another version, so be sure to come back and check it out!
Was the entire set stained darker? How did the distressed show dark spots if not?
The entire table top and chair seats were stained.
What did you use to sand the seat of the chairs in between and around the spindles and what grit did you use for the sand paper?
Hi Lisa- Use a 120 grit to get the intial pre-existing finish off and then go over it with an extra fine 220 or higher grit to smooth.
I’m having a hard time getting the Orange of the oak to not show through with dark walnut stain. Any suggestions?
If it’s an issue on staining and the oak color showing, you probably didn’t sand the wood surface down enough. It needs to get down to the bare wood in order to stain properly.
Do you recommend using a wood conditioner before staining? I’ve read that the conditioner helps the color go on more evenly but I’ve never stained before so I don’t know.
Also, how much chalk paint was needed? Was it a quart or a gallon?
Hi Lydia- I do not have expereince with wood conditioner, but it may be worth a shot.
Beautiful. I have a table/chair set very similar to this. I purchased it many years ago in honor of my mother after she passed away, so I do not want to get rid of it. This would be a great method to change it up. I also have the matching china cabinet. So now I am challenging myself to do the job. Thank you for the inspiration!
Thank you Linda!
Did you sand the legs of the table, or just paint? The legs seems difficult to sand
Hi, just found this post on the Shabby Chic refinished dining room table; hope it isn’t too late to impart some wisdom about refinishing furniture. I have done a lot of refinishing in my house and have always been successful EXCEPT when I tried to do an 80’s yellow pine coffee. I stripped the old finish off (Citistrip), sanded and used a wood conditioner, yes this is important, and then applied a dark walnut stain only to end up with something that looked like the contents of a baby’s diaper. LOL.
Pine is a soft wood and takes to staining differently and is more difficult than a hard wood such as mahogany, oak or walnut.
I stripped that dark walnut off again, sanded and sanded some more until I got close to a driftwood look and then applied BriWax liming wax (like whitewashing). I knew with this pine that I could not get to that walnut stain look without a lot of yellow/orange showing through so decided on “driftwood” by default. I left the bottom of the coffee table white as it was already white and distressed a few spots on it.
So, FYI, not every staining project is going to work out depending on the wood.
How do you do the distressing on the painted surfaces? Do you do it after the painting?
Love, love, love this idea as I too have the same table and chairs.
We were actually thinking of getting new table and chairs, but im certainly gonna give this a go first.
Can I ask one question tho, that maybe anyone could answer.
So I sand down everything that’s going to be painted?
And if so, will it all have to be sanded down to the bare wood?
Much appreciated.
Lee.
All products are just too good..Nice share
Hi! I was wondering if you could tell me what type of sander you used? I’m looking at this exact same project for my dining room table.
As well as how you were able to paint the white and it not mess up the stain and vise versa.
Did you also use a brush to paint the white? Thank you!!!!
Hi! I was wondering if you could tell me what type of sander you used? I’m looking at this exact same project for my dining room table.
As well as how you were able to paint the white and it not mess up the stain and vise versa.
Did you also use a brush to paint the white? Thank you!!!! Hope to hear back soon!
What type of sander did you use? Also did you spray the poly on or brush it.
Thanks
Hi Jennifer- I used a circular saw. I brush my poly on.
I only need to paint the pedestal base of my table. Can I use liquid sandpaper? it is a lot of curves to sand.
Hi Barbara- If you are using a chalk paint product there is no need to sand or liquid sand. I have never used liquid sandpaper, but if you appplying regular latex paint you will want to sand and prime before painting.