Saturday, October 24, 2015

Honest Review – Valspar Chalky Finish vs. Annie Sloan Chalk Paint

To start off, both of these products are wonderful and definitely worth trying out! Get inspired and GO PAINT!

Valspar vs. Annie Sloan

Similarities:
  • -Both Annie Sloan and Valspar require little to no preparation of the item you are painting. No sanding, no priming,…whohoo! However, both do have recommendations to sand for certain surfaces that are glossy, rusty, or chipping paint (just research a little if your canvas requires a little TLC). I also recommend always giving a furniture piece a once over with a damp rag or paper towel to ensure no debris or dust mixes with your paint. Just allow ample drying time before your first coat of paint (15 minutes is normally good).
  • -Both cover well, luxurious thick color application, give a great matte finish (I do however think Valspar looks more “chalky” if that makes sense), low odor, and all around super easy to apply with forgiving application.
  • -Both do not require you to use an expensive brush (Annie Sloan does have a special brush but it is crazy expensive). Find a brush that has long flexible (not too floppy) natural bristles or a flat brush for smoother look. This brush is also reasonable if you want something specifically for chalk paint.
  • -Both brands offer a clear protective wax coat and a dark wax to give your project an antique finish.

  • Pros:
-Great value – $29.99 Valspar 29oz can ($1.03 per fluid oz.) $38.50 Annie Sloan 32oz can ($1.20 per fluid oz.)  – saves $0.17 per fluid oz. about $5 savings for a can *prices based on VA
-Easy access (pick up at a local Lowe’s compared to hunting down a small boutique distributer of Annie Sloan)

-More color options (Valspar has 40 while Annie Sloan has 32)

Cons:

-Had to use more Valspar paint than Annie Sloan product

-Some people have complained that their color selections do not match the Valspar color swatches when mixed at Lowes
-Does not come in smaller sizes like the sample 4oz size Annie Sloan offers for $13.50 which is great for small projects or using multiple colors for a project

-People have stated the Annie Sloan waxes are better, however since I have not tried Valspar I cannot verify this myself

Here is an easy color swatch reference guide to compare the colors. The Lowe’s staff did state that ANY Valspar color could be mixed with the chalky finish, however researching Valspar does only have 40 tintable color options it recommends. But you can always take a chance if you find a color you just LOVE! (update 3/7/2016 – I went again to get Valspar paint for an upcoming project and the Lowe’s staff stated again that you can pick ANY color to be mixed with the chalky finish paint…WOW, what a selection!)

Photos via: http://thatcoversit-home.com, http://www.valsparpaint.com, http://www.anniesloan.com

Saturday, October 17, 2015

Pallet Coat Racks

The cold weather is officially upon us! We made these this summer with some free pallet wood and old coat hooks we found in our garage, and now is the perfect time to get them hung in our home.

These couldn’t be simpler, just use two pieces of pallet wood to make the base and then cut one piece of pallet into 2 or 3 small pieces to fit the vertically up the backside as your anchor and nail into the back. Find some hook eyes and screw those in so you can hang the rack. Then screw in your coat hooks however you want them spaced. And viola a pallet coat rack! So cheap and easy, have fun creating one of your own!

Thursday, October 15, 2015

Spooky Dinner for Two

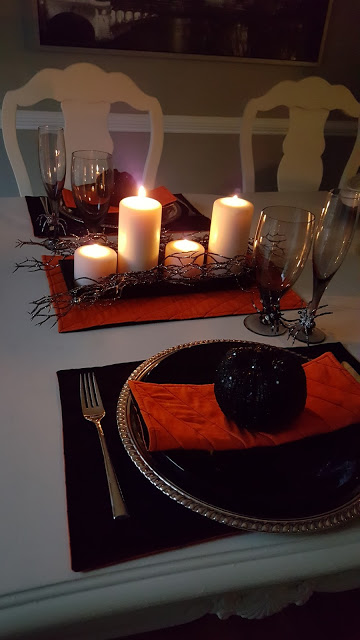
This spooky romantic dinner setting is a great way to celebrate the Halloween holiday with your spouse. And the best part, it only cost about $20!

What I used:

  • 2 black plates were found for $0.50 each at a local Habitat of Humanity = $1
  • 2 silver trays were repurposed as chargers from the thrift store for $3.45 each = $6.90
  • 4 reversible black and orange placemats from the thrift store =$3.50
  • Halloween spiders, black pumpkins, and glitter thorns were from Michaels (they had a great 50% off sale for all fall items) = $10.50
  • The silverware, glassware, candles, and candle base were already things I had and was able to use

How to build your table:

Start with a place you enjoy having dinner. Take it outdoors if the weather is nice!

Build from the ground up:

  1. Base (placemat and/or charger)
  2. Plate
  3. Napkin (I got double use out of the reversible thrift store placemats by using 2 as placemats (black side) and cutting one in half to use as 2 napkins (orange side). These would work great too!
  4. Plate centerpiece or name card. Loving the glitter pumpkins!

  5. Silverware on the outside of your plate setting
  6. Glassware on the top right (I did water and champagne with these awesome grey glasses I got handed down from my mother)
  7. Centerpiece (Use what you already have around the house, like candles, and just add some Halloween décor to make it special)

Hope you enjoy creating a thrilling Halloween table setting for your special someone. Eat, drink and have a wicked good time!

Thursday, October 15, 2015

Blog Lovin