Wednesday, January 6, 2016

2016 Goals

I know I’m a little late with the 2016 goals, but I bundled
last weekend into 2015 so I could enjoy one more night of wine and yummy food!
This 3 day weekend was amazing. Just having the time to do things around the
house like putting Christmas decorations away, loads of laundry, working out,
and spending some great quality time with family, friends, and of course baby
Hartley. It was a fabulous year seeing her grow and foster into a thriving
toddler and we just can’t wait to see what 2016 has in store for us!

Some of my goals are lifestyle changes that I want to
continue or revamp while others are monetary goals that are fostered by those
lifestyle choices.

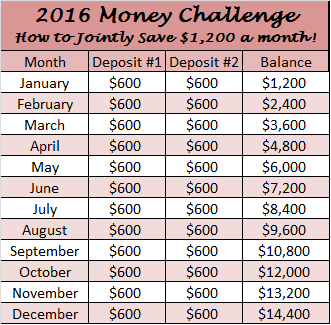
#1 – Save $1200 a month

Willie and I have budgeted are whole married life.
Subsequently, we are normally called the cheapos of our group. Willie’s best
man’s speech even included, “if you need a deal or coupon, call Willie because
you know he will find something”. We don’t skip on anything, at least we don’t
feel like we do, but we do make “informed purchases” is what I like to call
them.  Our goal for 2016 is to jointly
save $1,200 a month in order to help contribute towards a home purchase in the
near future. Here are some of my tips that may help you
save:

  • I know it sounds horrible, but it is very true,
    we rarely eat out unless we have a coupon or Groupon/LivingSocial deal
    • Using
      a coupon or local deal can save you anywhere 5-50% every time you eat out. That
      is a lot of saving over a year!
  • Price match and never pay retail!
    • I
      know this may seem simple, but you do not know how many people I know that buy
      off convenience. Don’t do it. Also, never pay retail. I cannot remember the
      last time I bought something retail price. Head straight to a clearance rack
      (DO NOT just distracted by the sparkly shirt in the window), shop at outlets,
      shop sales, and duh…use coupons.
  • Know what you can get second-hand
    • Realizing
      the savings you can achieve by shopping at second-hand markets is the best
      saving tip!
  • Meal prep and eat at home
    • Working
      in Washington, DC, lunches can be upwards of $12 a day! $12, 5 times a week is
      $60. For Willie and I lunches alone would be $120 a week if we ate out every
      day.
    • Drink at home. This includes coffee and alcohol.
    • For
      a family of three, we spend about $200 on groceries (I do buy organic and
      healthier products, so you can lessen this) per week and normally only eat out
      once or twice on the weekend. $200/21 meals (3 meals a day for 7 days of the
      week)/3 people = $3.20 per meal. HUGE SAVINGS!
    • Using Costco or Thrive Market save me a ton on healthy products!
    • I
      meal prep every Sunday, yes…even at 9 p.m. last Sunday night when I was boiling eggs,
      making a paleo egg casserole, and getting our pot roast ready for Monday. This
      allows us to start our week out on the right eating path and not get caught at
      work hungry and running out to fill up on junk and paying convenience prices.

#2 – Save for Hartley’s education

Willie and I started with a financial advisor and I guess
college is important, so here comes another savings goal for the next 17 years 🙂 We are hoping to dedicate
$100 a month towards Hartley’s college fund.

#3 – Live a more toxic free life

After a recent horror story from a good friend about having
a severe allergic reaction to a new couch that had been chemically treated, I
was pushed even further into looking into the toxins that surround us. I have
always been aware and on the “holistic” side of things, but when I was pregnant
I researched the crap out of things, and I was SHOCKED by how many toxins are
in every products. I use my SAVINGS HERE. I eat mostly organic, use Essential Oils, natural cleaning products (I only use Young Living Thieves Cleaner
for Hartley’s things and love Mrs. Meyer’s
honeysuckle scent for dishes), Glass Food Storage, natural
odor/air purifiers (like this amazing Natural Himalayan Salt), and use natural
cosmetics (Arbonne‘s Arbonne RE9 Advanced Set, their Baby Herbal Diaper Rash Cream
is also a miracle). This new year, I am committed to staying on this path
to living a less toxic and environmentally friendly life style. I am also
eating more raw whole foods and lessening my meat consumption!!


#4 – Expand my blog

As a “newbie” I want to expand my blog and learn how to
interact better with my followers. I am committed to grow this blog and hope to
reach 500 followers by the end of the year! Help me by sharing, pinning and tweeting!! Thank you!


#5 – Get inspired and share!

We are all busy…I get it. But this year I am committed to
trying new things, visiting friends more often, learning from others and most
importantly sharing stories, memories, advice with one another. This year will
be full of wonderful inspiration! 

Get ready 2016…I’m coming for you!

Saturday, October 24, 2015

Honest Review – Valspar Chalky Finish vs. Annie Sloan Chalk Paint

To start off, both of these products are wonderful and definitely worth trying out! Get inspired and GO PAINT!

Valspar vs. Annie Sloan

Similarities:
  • -Both Annie Sloan and Valspar require little to no preparation of the item you are painting. No sanding, no priming,…whohoo! However, both do have recommendations to sand for certain surfaces that are glossy, rusty, or chipping paint (just research a little if your canvas requires a little TLC). I also recommend always giving a furniture piece a once over with a damp rag or paper towel to ensure no debris or dust mixes with your paint. Just allow ample drying time before your first coat of paint (15 minutes is normally good).
  • -Both cover well, luxurious thick color application, give a great matte finish (I do however think Valspar looks more “chalky” if that makes sense), low odor, and all around super easy to apply with forgiving application.
  • -Both do not require you to use an expensive brush (Annie Sloan does have a special brush but it is crazy expensive). Find a brush that has long flexible (not too floppy) natural bristles or a flat brush for smoother look. This brush is also reasonable if you want something specifically for chalk paint.
  • -Both brands offer a clear protective wax coat and a dark wax to give your project an antique finish.

  • Pros:
-Great value – $29.99 Valspar 29oz can ($1.03 per fluid oz.) $38.50 Annie Sloan 32oz can ($1.20 per fluid oz.)  – saves $0.17 per fluid oz. about $5 savings for a can *prices based on VA
-Easy access (pick up at a local Lowe’s compared to hunting down a small boutique distributer of Annie Sloan)

-More color options (Valspar has 40 while Annie Sloan has 32)

Cons:

-Had to use more Valspar paint than Annie Sloan product

-Some people have complained that their color selections do not match the Valspar color swatches when mixed at Lowes
-Does not come in smaller sizes like the sample 4oz size Annie Sloan offers for $13.50 which is great for small projects or using multiple colors for a project

-People have stated the Annie Sloan waxes are better, however since I have not tried Valspar I cannot verify this myself

Here is an easy color swatch reference guide to compare the colors. The Lowe’s staff did state that ANY Valspar color could be mixed with the chalky finish, however researching Valspar does only have 40 tintable color options it recommends. But you can always take a chance if you find a color you just LOVE! (update 3/7/2016 – I went again to get Valspar paint for an upcoming project and the Lowe’s staff stated again that you can pick ANY color to be mixed with the chalky finish paint…WOW, what a selection!)

Photos via: http://thatcoversit-home.com, http://www.valsparpaint.com, http://www.anniesloan.com

Thursday, October 15, 2015

Spooky Dinner for Two

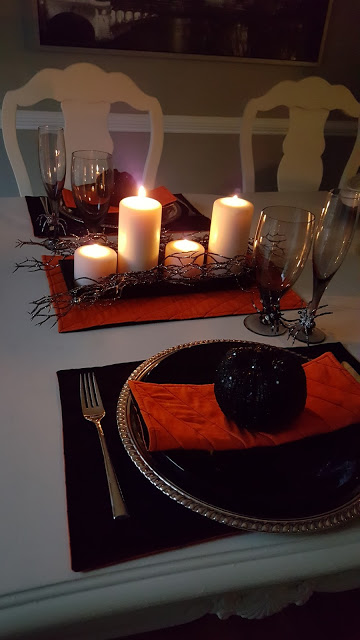
This spooky romantic dinner setting is a great way to celebrate the Halloween holiday with your spouse. And the best part, it only cost about $20!

What I used:

  • 2 black plates were found for $0.50 each at a local Habitat of Humanity = $1
  • 2 silver trays were repurposed as chargers from the thrift store for $3.45 each = $6.90
  • 4 reversible black and orange placemats from the thrift store =$3.50
  • Halloween spiders, black pumpkins, and glitter thorns were from Michaels (they had a great 50% off sale for all fall items) = $10.50
  • The silverware, glassware, candles, and candle base were already things I had and was able to use

How to build your table:

Start with a place you enjoy having dinner. Take it outdoors if the weather is nice!

Build from the ground up:

  1. Base (placemat and/or charger)
  2. Plate
  3. Napkin (I got double use out of the reversible thrift store placemats by using 2 as placemats (black side) and cutting one in half to use as 2 napkins (orange side). These would work great too!
  4. Plate centerpiece or name card. Loving the glitter pumpkins!

  5. Silverware on the outside of your plate setting
  6. Glassware on the top right (I did water and champagne with these awesome grey glasses I got handed down from my mother)
  7. Centerpiece (Use what you already have around the house, like candles, and just add some Halloween décor to make it special)

Hope you enjoy creating a thrilling Halloween table setting for your special someone. Eat, drink and have a wicked good time!

Friday, September 25, 2015

Hug in a Cup

In the spring and fall our city hosts a very prominent arts and craft show that pulls the attention of thousands of attendees and of course…I am one of them. There are tons of local businesses and artists which makes it one of my favorite events. This year I found a pottery artist that I was absolutely obsessed with!! Clays of Our Lives (pretty hilarious) by Brian Beckenheimer does not disappoint with his wonderfully crafted (almost tie-dye colored) functional stoneware. I went crazy and at $12 for these huge custom mugs, they were a crazy steal! These beauties just make my morning coffee so much better with their little personalities! (I also got a soup bowl and he threw in the mini vase as a thank you gift…so nice!)